CLICK HERE FOR FREE BLOGGER TEMPLATES, LINK BUTTONS AND MORE! »

Sunday, September 26, 2010

My Pink Stamper 5 Million Hits Celebration - Karlee's Challenge


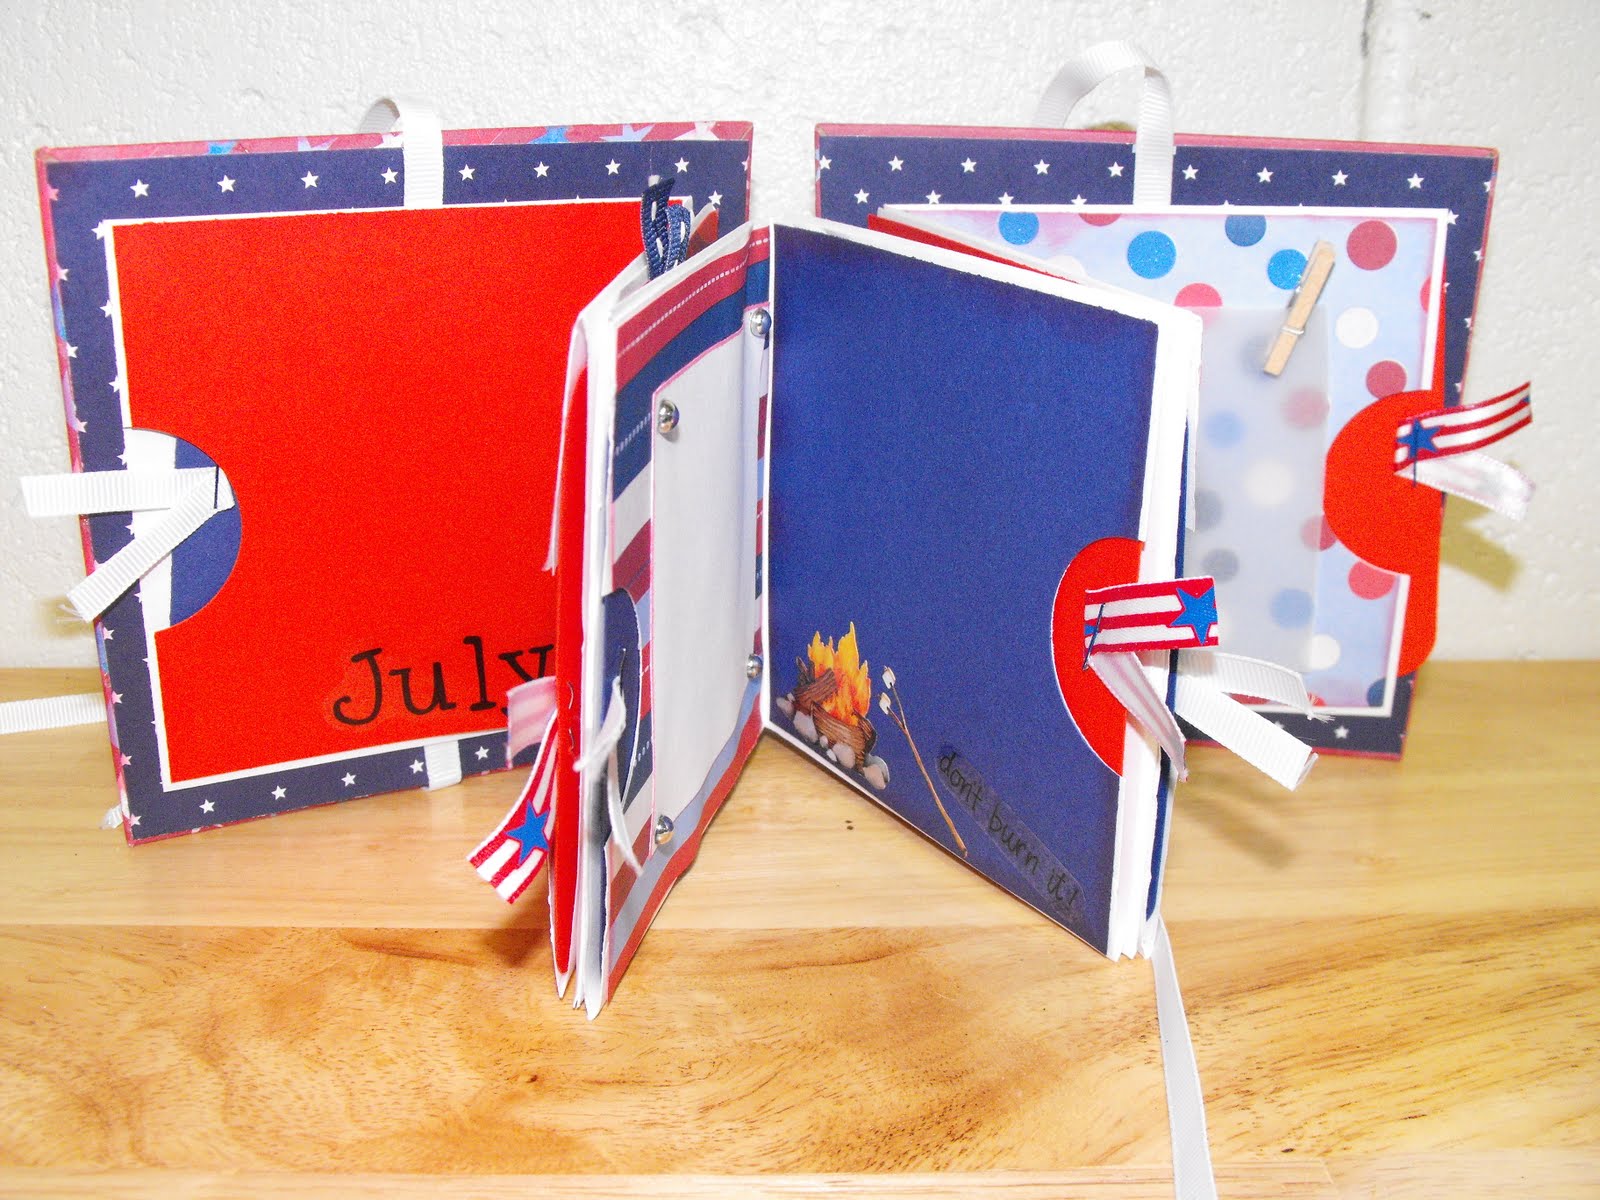
Karlee's Challenge on the My Pink Stamper website was to use an envelope on your project so I decided to make a mini album using #10 envelopes.  This is the second one I have made and they are sooooo super fun.  I made this one for my Uncle and his Wife to be to hold some of their wedding pictures. Here is the inside of the mini - I used 5 #10 envelopes to make my base pages and then covered them using DCWV Wedding Stack and some Peach cardstock.  The paper is cut at 4"x4" to cover the envelope pages, I inked the edges of all the pages, tags and mats with Distress ink.  I used the Cuttlebug, Cricut, bling, ribbon and some stickers to embellish my mini with.  Each page has a coordinating tag which is also cut at 4"x4".  I rounded the corners and added some ribbon to the top with a mini stapler.  I left one side of the tag to journal on and embellished the other side to match the page so it can hold another picture or some memorabilia from their wedding in Vegas.  The cover is made from lightweight chipboard cut at 5"x5" and then covered I added the ribbon before I attached the envelopes so the mini can be tied shut.  I  made the flowers on the front cover using flowers I cut from the cricut, glimmer mist, hot glue and a pearl.  I really loved how the flowers turned out - they were so simple to make.  I made one big flower with 3 layers and then added 2 smaller 2 layer flowers along with some fun fur trim and some pretty shiny bling to finish it off.


Thanks for taking a peek
~lori

Thursday, September 23, 2010

My Pink Stamper 5 Million Celebration Challenge

Today Robyn aka My Pink Stamper is celebrating 5 million hits on her blog.  The challenge of the day is to make something with a BIRD on it.  My husband and oldest Daughter (Izzy) went shopping one day and came home with a GIANT tub of Cheese Balls and Izzy asked if we could recycle it into something once it was empty.  It has been sitting on my desk waiting to be turned into a super cool bank for Izzy and Grace and since everyone says you need to save for a rainy day I thought that would be the perfect saying to add to the bank and since Robyn wanted us to use a bird I picked the little duck since it was so super cute I had to use it. 

Supplies used:
Create A Critter Cricut Cartridge
Stampin Up! Tempting Turquoise Cardstock
Recollections Purple Shimmery Cardstock
Yellow & Patterned Paper from my stash
Flower shaped Bling from Michaels $1 bin

Thanks for taking a peek
~lori

Wednesday, August 18, 2010

ATV Birthday Card

I made this card for my nephew Tyler who is turning 12 today. I stepped out of my box and made the base of the card with colored card stock - not white (shocking). It is a little more challenging to me to come up with male cards since I have 2 little princess'. I used my Gypsy to size and lay everything out (and I am loving the hide contour feature!!!) to make sure it worked. I know I need to work on my picture taking, the ATV is cut from shimmery paper to give it a metallic look. I inked the edges on the front of my card and the patterned layer. I also added a white layer inside to write on which I also inked the edges on.

I am entering this in 2 challenges this week:

Today's Wacky Wednesday challenge on More Than Favors is a Birthday Theme.

On Cricut Cardz Challenge today the theme is Anything Goes.

Card base: Stampin Up! Dusty Durango cardstock
Pattern Layer: Creative Memories Earthy Outdoor
Sign: Stampin Up! Chocolate Chip cardstock / Creative Memories Black number stickers
ATV: Camp Out Cricut Solutions Cartridge / Stampin Up! Basic Black cardstock / Recollections shimmery green cardstock
Stamp: My Pink Stamper Simply Sweet Occasions / Stampin Up! Basic Black ink pad
Thanks for taking a peek
~lori

Friday, August 13, 2010

Creative Genealogy 12x12 Sketch #41


I love Rowena's sketches and every week I look at them and think I would love to try my hand at one, so today as soon as the littlest one went down for her nap I headed to my craft island. This is my take on Rowena's sketch, I did not have any 4x6 pictures all the ones from Isabelle's Birthday party are all 6x4. I do have to say this was one of the easiest pages I have ever made thanks to following a sketch. I can not wait to try using some more of the wonderful sketches that Rowena has on her blog. Since my daughter picked a Dora theme for her birthday I used the same for my layout. The patterned paper and Dora stickers are from a pack that I got at Michael's, the letter stickers are from Creative Memories, the border punch is from Stampin Up! and the background paper is Textured Cardstock from DCWV Paper Stack from Michael's.
Thanks for taking a peek
~lori

Thursday, August 12, 2010

Scrappin - n - Chattin Blog Hop

You so need to check out the Scrappin - n - Chattin Blog Hop going on - they have some amazingly talented ladies (and some awesome blog candy). Start at Abby's blog and hop your way through - hopefully you will be inspired!

Wednesday, August 11, 2010

Throwback Thursday Challenge #9


This week Emma has a Back to School theme using the Paisley cartridge, well I do not have the Paisley cart nor do I have a child going to school this year. I decided to make a 12x12 scrapbook page for a friend who's oldest will be in second grade this year, her school colors are blue and yellow. I used the Doodlecharms cartridge to cut my school bus. I have to say this is a true challenge for me because when I scrapbook I have the pictures in front of me that I want to use and pick my items accordingly. I did have fun using some of my new tools - I used my pink ATG, Martha abc/123 border punch (both from Michael's) and a school days clear stamp set (from Big Lots). The Yellow star paper is from DCWV "All about Boys" paper stack, the blue is from Bazzill and the ink I used is Night of Navy from SU! I think my bus could use a little bling!!
Thanks for taking a peek
~lori

Thursday, July 29, 2010

Heartfelt Thanks


Here is a quick and simple Thank You card I made. I really liked the colors in the pattern paper. It is a very shimmery card as the purple is a shimmer paper and I used some Glimmer Mist on the flowers.


Products used:

Purple Shimmer paper - Recollection
Pattern paper - DCWV Pocket Full of Posies
Glimmer Mist - Silver Sugar by Heidi Swapp
My Pink Stamper Simply Sweet Occasion Stamp
Basic Black Stampin UP! ink pad
Prima Flowers
Purple brad

Friday, July 23, 2010

Cardz TV Challenge

Here is my card for the Christmas in July challenge with Cardz TV this time around you had to use a tree. I started with a white A2 card then started layering things. Since I had no idea in my head of what I wanted to do, I just jumped right in (I did "redo" things a few times) and started cutting and inking things. I decided to use a sticker as I did not have a tree stamp (I own very few stamps) and didn't really like the tree I cut out from my Doddlecharms cartridge.

I used:
White Cardstock
Real Red SU! Cardstock
Spots Dots Cuttlebug Folder
Whisper White SU! Grosgrain Ribbon
Garden Green SU! Ink Pad
Epoxy Sticker (from my huge stash of stickers)

Tuesday, July 20, 2010

Christmas in July


I had so much fun doing a challenge last week that I decided to try a couple more. This week the theme over at The Cuttlebug Spot and Fantabulous Cricut is Christmas in July. I used my Gypsy with the Strech Your Imagination cartridge to make my gingerbread person (I love the hide contour feature!) and my Peachy Keen stamps for the cute face. It is hard to tell but I embosses the white strip with my Swiss Dots folder and the on the red cardstock I used the D'vine Swirl folder. All the paper and ribbon used for this card is from Stampin Up!


Saturday, July 17, 2010

Purse card


I made this card at a Michael's card night. It was super duper quick and easy. It started as a normal A2 card then I trimmed the sides at an angle. The top flap was cut with a Nestabilities oval die using the Cuttlebug. I used my scallop circle maker and circle maker from Creative Memories, My Pink Stamper Simply Sweet Occasions stamp, and random ribbon from my stash and a giant brad to finish off my purse. The card only took minutes to make - super simple. (Sorry that the picture is a little blurry).

Friday, July 16, 2010

Mini Album

Every year we celebrate the 4th of July with family. We get together and camp in Munising, MI and it is a lot of fun. This was going to be Maddy's first year coming, she is 8 and was super excited about coming so I wanted something for her to remember her trip. I was watching a video about mini albums made from envelopes and thought I could make that for miss Maddy. So here is my very first mini album (thank you to Laura from The Paper Trail). You can check out her video to see how to make them. I had alot of fun putting it together and using "thick" things that I would normally not use in my own scrapbooks as I try so hard to fit a year in one 12 x 12 album. I also got to playt with my stamps that have not seen the light of day in a million years and all my old ink pads (which I was pleasntly surprised were still nice and juicy). Most of the supples came from my stash which I am pretty sure means Michael's or Creative Memories the stamps and ink pads are from Stamin' Up!

Thursday, July 15, 2010

Throwback Thursday Challenge #7


Today Emma's Throwback Thursday Challenge is to make a card using "Your Favorite Holiday" with the "Wild Card" cartridge. I do not have that cartridge so I used "Plantin Schoolbook" and "Doodlecharms" to make my Halloween card. Today I challenged myself further and made a "shaped" card. I used the tag from Plantin for my card which I welded with my Gypsy and sized it at 8.5 x 5.5. My cute little spider which was cut out of some sparkly black paper using the Doodlecharm cartridge. Since I am new to challenges and blogging here is my "recipe" for you. I used some random orange cardstock for my card base, the patterned paper is from Creative Memories which I embossed with the swiss dots folder, sanded and then inked with basic black from Stampin Up! The "eek" is a sticker from CM and the eyes are from the Dollar Tree. The plain black is out of my scrap box and the sparkly is from Michael's, I am not sure on the ribbon and fiber it was in my stash. I am soooooo happy that I finally get to "play" along with Miss Emma this week!!!!

Wednesday, May 19, 2010

Pregnant Belly Cards


My friend Kris (she does beautiful henna work and asked me to make her some thank you cards to send out to some of her customers) has alot of ladies that love to get their beautiful baby bellies hennaed, so here is my take on a thank you card for them. My favorite color is orange so I LOVED using this paper. I started with a basic white A2 card and added a layer of glimmer purple (from Michael's) cut at 5 1/2 x 4 1/4. The patterned paper is from DCWV Pocket Full of Posies cut at 5 1/4 x 4. The beautiful pregnant belly is cut out of a glimmery ivory paper from Michael's - I had a die cut that my husband transferred to a thin block of wood for me so I could trace it over and over. I used a stamp from the My Pink Stamper Simply Sweet Occasions set stamped with Basic Black stamp pad from Stampin' Up! Thanks for stopping by.

Tuesday, May 18, 2010

Mickey Mouse


This super cute card was made for my Nephew who will be turning 2 in June. I used my Gypsy to cut out Mickey, the plaid square and the #2 (and man were there alot of small parts for Mickey!). I used the Mickey and Friends cart to cut Mickey out of scraps at 3 1/2". I used the Mickey Fonts cart for the #2 which I cut out of the same red and also shadowed in the same blue. The plaid paper is from the DCWV All About Boys stack that I got a great deal on at Target. I also used a little bit of grosgrain ribbon in Whisper White from SU! Man do I need to clean off my desk......

Monday, May 17, 2010

Thanks!

This is another card that I made for my friend Kris with Behennaed. I had fun trying to dress it up and make it a little more frilly. The brown and blue combo looked better in my head. I used some sheer ribbon from Michael's and some silver bling to add the frillies. I used the Sans Serif Cricut solutions cartridge. I used the wavy blade in my CM rotary cutter on the strip of ivory glimmer and blue paper. I believe all the paper was purchased at Michael's (as that is the only scrap store in my area).

Sunday, May 16, 2010

Rock Star Birthday Card


This is the very first card I designed in my Gypsy! I needed a Birthday card for my Nephew who turned 9. I used paper out of my stash (I have no idea what brands they all are) and some out of my scrap bin. The music notes and #9 are stickers from CM, and the "Birthday Fun" stamp is from the My Pink Stamper stamps. I cut the "Rock Star" from the Everyday Paper dolls Cricut cartridge. I used some Glimmer Mist on the guitar, amp and microphone. I used a face stamp from Peachy Keen stamp set Everyday faces. I was having issues with my camera - I took 20 pictures and they were all fuzzy so this is as good as it gets. Thanks for looking! (Oh yeah please ignore the messy desk clutter in the background)

Thursday, May 6, 2010

Kwerner Design Color Inspiration Photos Challenge


I saw this challenge and new right away I had to submit one of my favorite photos of all time. This was taken back in July 2005 during our annual Fourth of July family camping trip.

Monday, May 3, 2010

My Pink Stamper Challenge #4


Here is my entry for "I Like You the Least". My least favorite thing is cutting letters for a card or layout as I can never get them straight and they are hard to glue down (kind of messy). I tend to use phrases off the cartridges instead of the letters so in true challenge form I did 4 cards using letters from the Sans Serif Cricut cartridge. To this one I added a Prima flower, some sheer ribbon, shimmery ivory paper and a silver stud to "girly" it up a little (this is the same papers as my Dad card).

My Pink Stamper Challenge #7

Here is my "Hey Dad" entry. Nothing fancy but I tried a few new things. I used the Swiss Dots Cuttlebug folder and then I sanded my paper. The blue strip of paper was cut with my Creative Memories Rotary Cutter using the Wavy blade. I cut the "{Dad}" using the Sans Serif Cricut cartridge.

Saturday, May 1, 2010

My Pink Stamper Challenge #6


This Challenge is "kids craft too". Here is the card that my daughter (she will be 4 in a couple of weeks) made for her Daddy. The base is a pre-made card from Michael's. The kitty and doggie are foamies that she added. "Daddy" was cut with the Every Day Paper Dolls Cricut Cartridge (she loves to push the buttons), he was cut a 4". I did make the heart for her and she wrote her name with a white jelly roll pen. Nothing fancy but she sure had a good time making it ~ she was super "cited" for her Daddy to get home so she could give it to him.

My Pink Stamper Challenge #3


This Challenge was to "think outside the box" and use or try something that you don't normally do. So I put all of my stuff on a little bit of an angle and I used some brads which I even distressed.
I started with a basic A2 white card and added a piece of Recollections grey cardstock cut at 5 5/16 x 4 1/8. The striped cardstock is from My Minds Eye 29th Street Market cut at 5 x 3 3/4. The pregnant belly is cut from Paper Reflections solid cardstock.
This one was hard for me, I guess that is why it is called a challenge. Not having things straight is way out of my comfort zone!

My Pink Stamper Challenge #2


Here is my project using my scraps. I made a basic A2 card and then just cut a strip about 2" wide that I punched both sides of with a Fiskars border punch, added a strip of yellow and some purple ribbon from American Crafts. I cut the cupcake from the Once Upon A Princess cartridge at 3 1/4", I also used some stickles.

National Scrapbook Day

Here is my card for the My Pink Stamper NSD Challenge #1


I made a basic A2 white card. The first pink layer is Creative Memories paper cut at 5 3/8 x 4 1/4. The patterned paper is also from CM and is cut at 5 1/4 x 3. The pink (same paper as first layer) is cut at 5 1/4 x 1 1/2 and I used the Stampin Up! Celebrations punch on it. The green is also from CM cut at 5 1/4 x 2 which I ran through my Cuttle Bug in the Swiss Dots folder. The flower was was cut from the Once Upon A Princess Cricut Cartridge at 2 1/4", all of the paper used was scraps and the pretty gem is from Recollections and the Grandma sticker is out of my stash.

Friday, April 30, 2010

Thank You Cards


I made these cards for my friend Kris with Behennaed. After seeing some of the cards I had made, she asked me if I would be willing to make her some to send to her clients. I did have to chuckle as I was trying to pick papers to match her business colors (I am color blind - or I should say tone blind as I can see some colors) which are jewel tones. I had a lot of fun trying some new techniques and stepping out of the same old rut we all get into.


The cards are a shimmery blue - they look black with my black background. I am not sure of everything I used, but most of it came from Michaels. The blue shimmery paper on all 3 is from Michaels and the words are cut form the Calligraphy Cricut Cartridge. The white ribbon on the first card is Whisper White grosgrain from Stampin Up! and the flowers are Primas which I added a little stickles to the center of. The ribbon on the second is from Michaels and the slide is from colorbok and the swirl thing is from the Home Decor Cricut Cartridge. On the third card (which is my favorite) I used a versamark pad to stamp a flower which I then used some Pearl Ex from Stampin Up! on along with the ribbon from Michaels and a little silver bling that I found there too.


Friday, April 16, 2010

No crafting today just shopping

I was not able to craft today but I did have time to do a little retail therapy. I got the Everyday Paper Dolls Cricut cartridge from Michael's (they have them on sale this week - whoo hoo) along with some paper, a little scrapbooking bling and a new white jelly roll pen. I hope to get alot of scrapbooking done on Sunday as I will be attending a 12 hour Creative Memories crop.

Wednesday, April 14, 2010

Two more cards made

Today I was able to sneak in a little bit of crafting thanks to Granny, she came over to "play" with the girls so while Grace was napping and Granny was reading to Izzy I headed to the basement (after I dusted and vacuumed). Here are my creations ~ Enjoy!


"LOVE CARD"

I started out with a basic 5 1/2 x 4 1/4 card out of white cardstock, I added a 5 1/2 x 4 1/4 layer of glttered paper in a pretty teal it is from DCWV Winter Gloss & Glitter Mat Stack. The paisley layer is also from the same mat stack it is cut at 5 1/4 x 4. I used some brown satin ribbon and a silver slide out of a Colorbok Everyday Embellishment Kit. I cut the word "Love" with my Home Decor cartridge at 1 1/2", the shadow is cut from the teal glitter and the base is cut from a brown cardstock which was in my scrap container so I am not sure of the brand.


"CATERPILLER CARD"

For this one I started with basic white cardstock cut at 4 1/4 x 8 1/2 which made a perfect square card at 4 1/4". I cut the first layer from CM pink cardstock at 4 1/8 x 4 1/8. Then I layered a green patterned paper from CM cut at 4 x 4. My cute little girly caterpiller was cut with the Stretch Your Imagination cartridge out at 1 3/4". I used a CM pink patterned for the shadow, CM green cardstock for the base and CM pink cardstock for the layer. I added some gems (out of my stash) for her eyes. The pink patterend layer (did not write down the size) is also CM paper which I used a fisker border punch on. I used a SU! basic black stamp pad. The stamp is a cheap one that I have no idea where it came from.


Sunday, April 11, 2010

Butterfly card


Here is the card I made for the My Pink Stamper Color Challenge (it was my first attempt at card making) using Pink, Green and Black. I started by making an A2 size card out of white cardstock. The black cardstock is from Creative Memories which I used the SU! Celebrations border punch on. The patterned paper is from Making Memories. I used the Once Upon a Princess cartridge to cut the butterfly which was cut from cardstock out of my scrapbooking stash. The ribbon is Whisper White Grosgrain from SU!.